Automate your Editorial Graphic Designs with GREP 🚀
Say goodbye to tedious tasks and make your Editorial Design process more efficient with GREP Automations.
Hello design freaks!
Are you ready to take your editorial work to the next level? Want to save time and add some magic to your designs?
Tired of spending hours on repetitive and tedious tasks in editorial design?
It's like magic!
With GREP, you can streamline your workflow, add precision to your designs, and unleash your inner editor. Say goodbye to manual labor and hello to effortless automation. Join us on a journey to discover the unlimited potential of GREP in editorial design.
INDEX:
What is GREP and How Does It Work?
Have you ever heard of GREP before? No worries, I'm here to explain it all to you.
GREP stands for "Global Regular Expression Print" and it's a powerful tool in editorial design that allows you to search and manipulate text in ways you never thought possible. With GREP, you can easily find and replace text patterns, automate tedious tasks, and even do complex operations with just a few clicks.
Now, I know what you're thinking. "That sounds super complicated, I could never learn that!" But don't worry, the basic syntax for GREP is pretty simple, and with a little practice, you'll be a pro in no time!

Benefits of Using GREP in Editorial Design
Now that you know a bit about GREP, let's talk about why you should use it in your editorial design work. Firstly, GREP saves you time. With GREP, you can automate repetitive tasks and focus on the creative aspects of your work. No more manual labor, just pure creativity.
Another great benefit of GREP is accuracy. With GREP, you can quickly find and replace text patterns, ensuring that your work is error-free and consistent. Say goodbye to typos and hello to polished and professional designs.
But the benefits of GREP don't stop there. GREP also opens up a world of creative possibilities. With GREP, you can easily manipulate text in ways you never thought possible, making your designs unique and eye-catching.
- Find and replace operations: GREP can be used to search for specific words or phrases and replace them with new ones. This can be especially useful for fixing misspelled words, updating names or terms, or replacing outdated information.
- Formatting text: GREP can be used to apply consistent formatting to text, such as changing font size, color, or type. This can save time and ensure that the text looks professional.
- Working with styles and stylesheets: GREP can be used to work with styles and stylesheets in editorial design. For example, you can use it to quickly apply styles to specific words or phrases, or to change the styling of headings or other elements.
- Searching for specific patterns: GREP can be used to search for specific patterns in text, such as numbers, dates, or email addresses. This can be useful for extracting information or sorting data.
- Replacing line breaks and white space: GREP can be used to replace line breaks and white space in text, making it easier to work with large blocks of text.
- Removing unwanted characters: GREP can be used to remove unwanted characters, such as extra spaces or punctuation, from text. This can help to improve readability and simplify the text.
Getting Started with GREP: Regular Expressions Unlocked
The first step is to familiarize yourself with the GREP syntax. Don't worry, it's not as complicated as it may seem. With a bit of practice, you'll be a GREP pro in no time.
Regular expressions, or "REGEX" for short, are patterns that help you search for specific text or formatting in your files.
These are regular expressions written in a common syntax called "Perl-compatible regular expressions" (PCRE)
Once you have a handle on the syntax, you can start using GREP in your editorial design work. Start small and gradually work your way up to more complex operations. Remember, practice makes perfect, so don't be afraid to experiment and have some fun with GREP.
Here are some examples of common regular expression patterns:
- The dot ( . ) matches any character
- The asterisk ( * ) matches zero or more of the preceding character
- The question mark ( ? ) matches zero or one of the preceding character
- Square brackets ( [ ] ) match any of the characters inside
- The caret ( ^ ) negates a character set, so [^A-Z] matches any character that's not uppercase
- This (?i): omit uppercase or lowercase letters in the search for a word (pet, Pet, pEt, peT, …)

With these building blocks, you can create more complex patterns to match exactly what you want. Want to find all the instances of "design" at the beginning of a line? Use the caret and the word: "^design". Want to find every instance of "font" or "typeface"? Use the pipe symbol (|) to separate your options: "font|typeface".
So now you have the basics, but don't just take my word for it. Give it a try and see what you can accomplish with regular expressions and GREP!
Practical applications of GREP automations
Are you ready to start using GREP to optimize your editorial design workflow?
It's time to take action and start reaping the benefits of this powerful tool.
Here you will find a collection of my most used and useful GREP codes in the editorial design process so you can copy and paste them into your design software.
Finds a specific word regardless of whether it has uppercase or lowercase letters.
(?i)word
This is useful for changing or styling a particular word.
Sometimes if the word has few letters it can get confused and it will find those letters inside other words.
To avoid this, here is a formula to find independent words. It is also case insensitive.
\b((?i)word)\b
This GREP code will search for a particular word, regardless of whether it is written in upper or lower case, and select its first letter.
\b(?=((?i)word)\b).
This code is one of the most useful. It can be used to apply capital letters (for example) to the first letter of a particular word.
Find a word that does not have an "@" at the beginning of it.
(?<!@)word
This code is useful if you apply a style to a word, such as a brand name. This way you avoid that style in the brand mails.
Here is a GREP code that looks for 4 numbers together. For what? For example to give a specific text format to years or dates.
\b\d{4}\b
This code looks for mails with this format: something@site.com
[-_.\w]+@[-_\w]+\.[\u\l]{2,3}(\.[\u\l]{2})?
This code locates the words "H2O" and "CO2" and selects the number to apply a superscript style to it.
(?<=CO)2|(?<=H)2(?=O)
Look for the word "banana" following the word "apple".
(?<=\bapple )banana\b
Search for the 11th word on a line.
^(?:\w+ ){11}(\w+)
I use this code to visualize a correct line width with a maximum of 11 words per line.
Search for words after a period, double period, comma followed by a space.
(?<=(\.|,|:|;)\s)\w+\s\w
I use this, with a style in InDesign to avoid splitting words. This way I avoid having a single word after a period, comma or double period.
Look for single letters at the end of lines, to also apply the "no break" style.
\h\K\w\h\w(?=\w+)
I use this code to avoid a single letter at the end of a line.
Find the last 10 letters of a paragraph.
.{10}$
I use this code also with the "no break" style. This way I avoid a single word or two (10 letters) at the end of a paragraph.
Get Hands-On: How to Use Grep in Adobe InDesign
So, let's get started! In this section, I will provide step-by-step tutorials on how to use grep to automate tasks in InDesign. With screenshots, clear explanations, and simple "how to's", you'll be a grep master in no time!
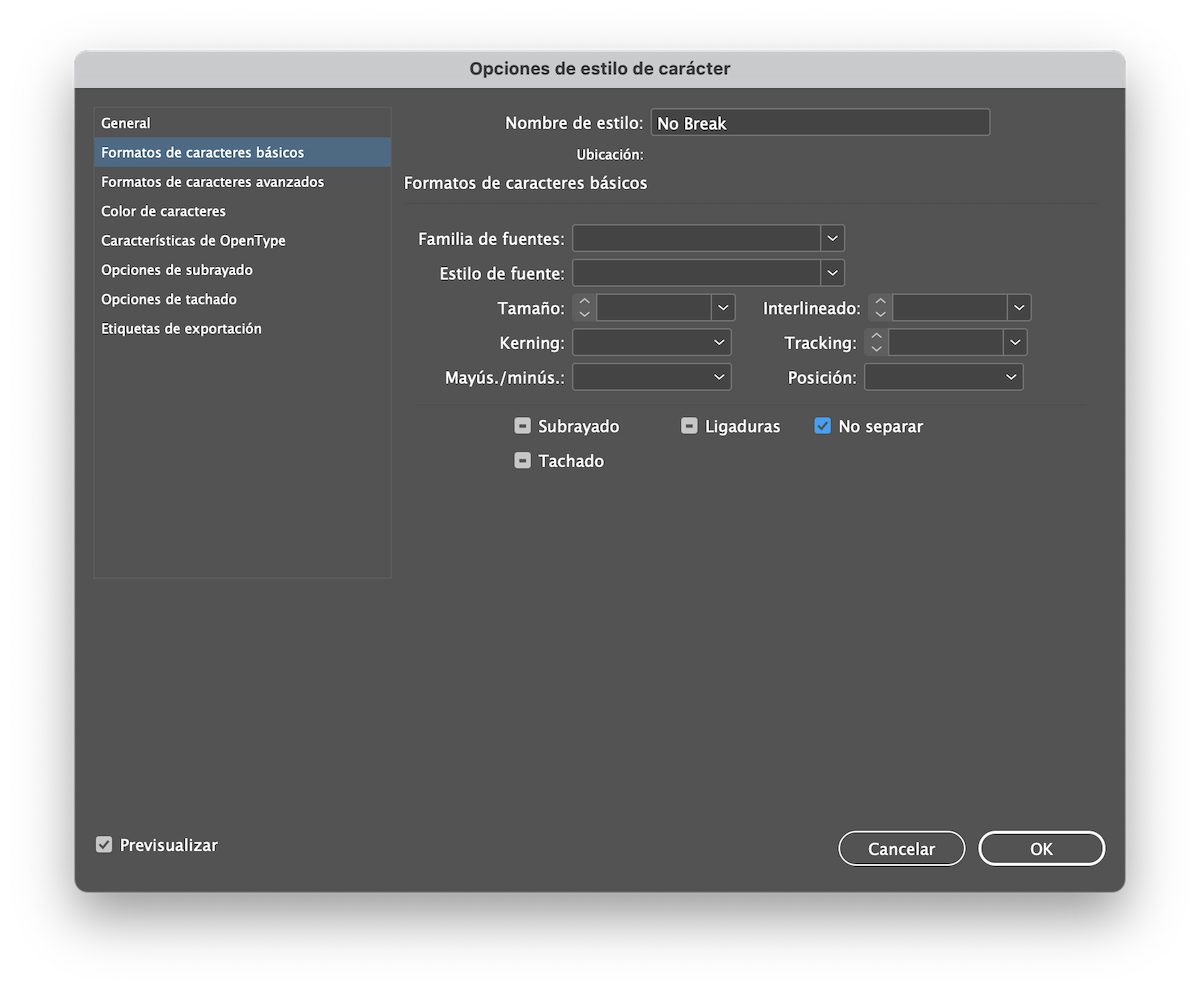
Step 1. Create the Character Style to be applied.
To start with, we will create a new character style. I will call it "No Break"

I will put a red color, simply to see visually where it is applied, then we will remove it. And we'll put "no break" characters, so it will keep the words together.

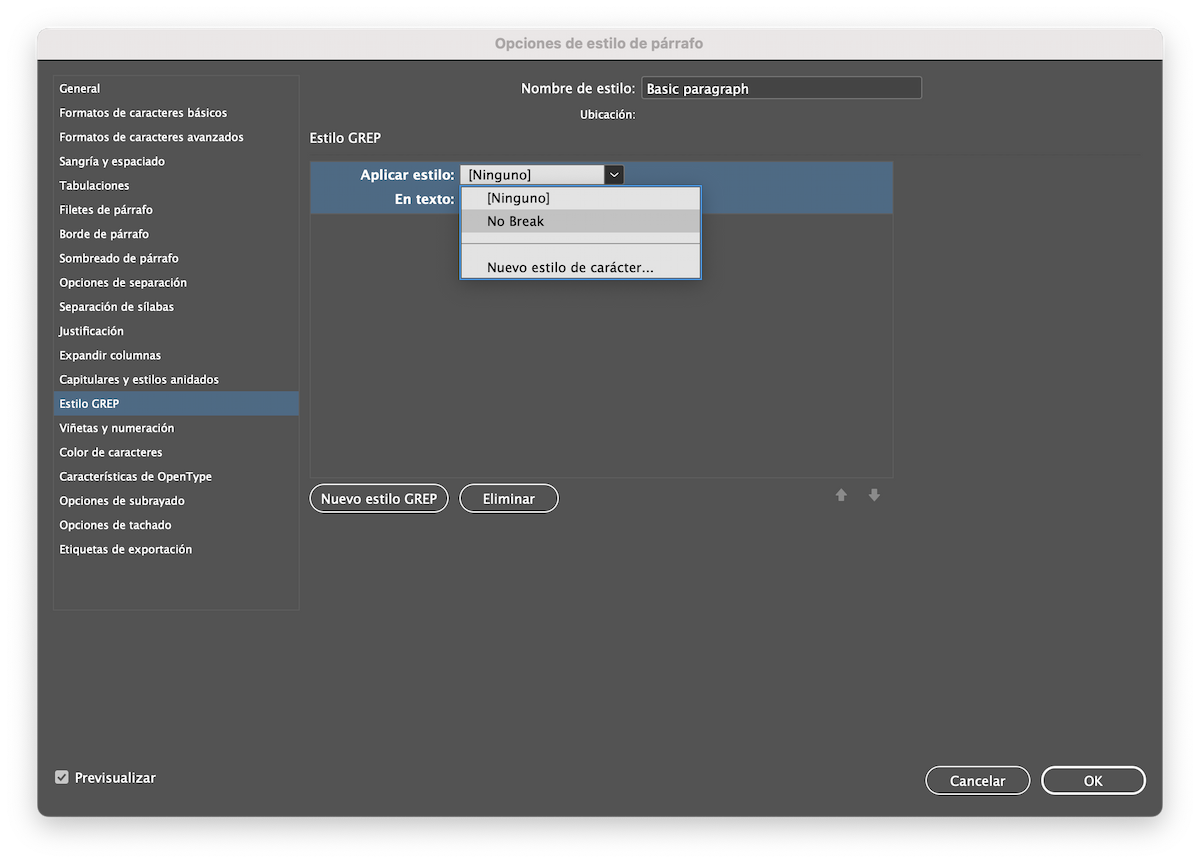
Step 2. Create new Paragraph Style with the GREP code.
Now the magic begins! We will create a new paragraph style. I have called it "Basic paragraph" but you can call it whatever you want.
We will go to the "GREP Style" section and "in text" we will put the GREP code I have provided above, I have used the "Single letter at end of line". In style to apply we will select the character style "No Break" created in Step 1, or the one you want to apply.

Step 3. Applying the Paragraph Style.
Now you must select the text and apply the created Paragraph Style, in my case "Basic Paragraph".

As you will see, the letters "single" followed by the next letter will be in red.
And since they have "no break" they will never be at the end of a line, because they will always join the next word.

This is simply an example. But it's a good trick to save you a lot of time on long texts.
If you combine this with several other GREP codes, and put it together with InDesign's "Balance Ragged Lines" feature you will have perfect paragraphs without looking at them!
Just copy and paste the text and it will be formatted automatically.
Step 4. Create your own hyper-optimized paragraph style.
Now it's time to find out what your needs are and what you can solve with a GREP code.

For example in the image above there are some hyper-optimized paragraphs with GREP codes. This text has applied:
- No Break (red): For single letters, last 10 letters of the paragraph and letters after a period, comma or double period.
- Superscript (green): For copyright and registered trademark symbols.
- Subscript (green): For the number 2 in H2O or CO2 formulas.
- Caps (blue): For the first letters of some random words, just as example.
- Highlighted in yellow: For text faults such as double spacing.
Now it's your turn!

If you have any doubt, suggestion or recommendation for me to add any more utility do not hesitate to Contact Me.
Related articles or content:
These articles, resources and/or content will help you improve and learn more about creativity and other related topics.

Transform Problems into Opportunities with Design Thinking

Book cover design that fits the book mood